Showing posts with label Softwares. Show all posts

5 Ashampoo softwares for free !! [cost $109.95]

Wednesday, March 14, 2012 | comments


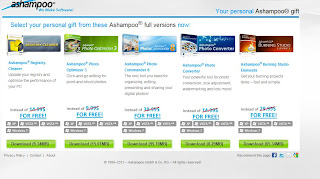
Here is a valuable change to get 5 Ashampoo softwares for Free ! The have offered this chance for these softwares cost $109.95

Ashampoo Burning Studio Elements
Ashampoo Registry-Cleaner
Ashampoo Photo Optimizer 3
Ashampoo Photo Commander 8
Ashampoo Photo Converter 


First visit here,

If you haven't ashampoo account register for a new account. Then click here and follow..

Click "Get downloads now"


Then you can see what you can get for free.


Now download what you need. After you installed one , a new tab will be opened in browser and will show registering keys. 


Copy it and paste.


Now enjoy...!! :D Don't miss this offer!

Tips on making Prezi Presentation more interactive

Tuesday, November 29, 2011 | comments (2)

 If you are using Prezi to create presentation, here are some of the tips and tricks to improve and to extend the limitations.
I assume that you have used Prezi before and have created couple of presentation using Prezi. If you are new to Prezi or have not used before, refer to my previous post on Prezi.
I have been using Prezi to create no of presentations and found out different methods to address some of the limitations on Prezi. If you are new to Prezi, just create couple of presentations before you continue this tutorial. So here are some of the limitations i found on Prezi and how to work around them. 
When a picture are zoomed in, it flicker or disappear  
There are two approaches, the most intuitive approach is to have a high resolution picture. but if you have tried this, you may have found that it is not a good approach.
My suggestion is to make the picture a SWF and import it as a SWF. SWF stands for Shockwave Flash and you can simply export your photo or image using Adove Illustrator or any other leading photo editing softwares.
How to add animations 
Again there are two approaches, either you can use a import as a Video or you can import as a SWF. There are pros and cons to both of them. If you add a video, it will start playing when it got the focus and it will remain still when you are viewing the background but if you use a SWF, it will animate even in the background. Of cause you need one of the Adobe softwares to convert between them or you can use online converters available on the internet.
What will be shown on the screen when I project this? How far it will show? 
This is vary critical if you are planing paths in between frames. If you have done a presentation on Prezi and presented using a projector, you might have noticed that the exact screen you saw on the screen is not what you see on the projector. (Most of the time right and left edges are different). This makes a presentation poor as what you planed to show ahead will be shown in this frame.
This is mainly because of the resolution problem. Most of the Projectors works on 4:3 ratio and the laptops and desktops screen aspect ration will be different to each other.
To overcome this issue, You can use standard frames when building your presentation. You can simply press SHIFT key and draw the frame, and Prezi will make the frame in to the ratio 4:3. So what will be shown on the projector is everything you put in to this frame. Most of the times, when you view this in your laptop it may show some excess things on top and bottom of the frames, but believe me it will not be shown on the projector. The other approach is simply to change the resolution of the laptop to 4:3 ratio resolution. This will make life more easier as what you see on the screen is exactly what you see in the Projector. Suggested resolution schemes is 1024x768.
When i focus on images, and text it will zoom more or does not zoom to the required level
This is where the frames comes in to play. I strongly recommend not to focus in to pictures or images. The best practice is to add a frame and focus on the frame, It makes more flexible and you easily change focus of different elements. Common practice is to build the story board and add frames accordingly. This will make sure every frame is on top of the story board and makes it more easy to manage.
How to rotate the camera?
This is a simple task. Add a frame and rotate it to the angle you want. Then add a path to it. Prezi will automatically rotate the camara and focus the frame up right in the meantime giving a nice spin effect. Beware: Do not spin so many times as it make distract the audience.
How to remove the Prezi logo on the bottom of the screen?
Prezi removes this logo or you can replace it with your own logo when you have a professional version. But if your are a student of a reputed University, you can ask for a Prezi EDU account which will allow you to remove this logo. All you need to do is sign up using the institutional email address with Prezi. I use my University of Moratuwa email to get away with this.
Can I use custom colours on my presentations?
Of cause you can use custom colours on the presentation. But you need to create a theme first. But using the new Prezi CSS editor, you can easily edit CSS of the presentation, which makes it more flexible to an advanced user.
Can I use Prezi on Powerpoint?
You can integrate both Powerpoint and Prezi. I will discuss this in a separate post
When I add a video, it will crop. Can I avoid this?
This is one of the critical problems I found on Prezi. There are couple of ways to work around but it may take considerable amount of time to archive this. One way is to change the background to suite the player. You can use background on the video. The second method makes it more attractive but you need a good knowledge in video editing to exactly match the background to the video itself.
Update - Prezi has added a lots of new features You can check them out from http://prezi.com/learn/new-features/
Here is a nice presentation I found on the internet, created by an intern in Prezi. There are no of suggestion to improve your presentation overall. I hope you enjoyed reading my article and if you have any questions regarding Prezi, add a comment and I will try my best to answer it.

How to hide, lock, invincible your files, folders or harddisks

Monday, November 28, 2011 | comments (1)

Everyone has certain files that s/he would rather keep private, especially guys. One of the ways to do that is to make such files hidden and bury them deep in the system files. The problem with such approach is that it’s not really convenient if you need to access those files on a regular basis.
So if you’re interested in something more convenient, here are some of the ways to keep “important” files or drives invisible hidden or locked.

1. Click “Start”, “Run,” and then type cmd. When the command prompt opens type “CD C:Test” (replace “Test” with the name of the folder you want to hide.)2. Now type “attrib file +s +h” and replace “file” with the name of the actual file name you would like to hide.3. Now, go back to C:Test and look for your file or folder, it’s not there! You cannot find it through simply browsing around, through the command prompt, or even if you click “Show Hidden Files and Folders”.4. To find the folder and its contents again simply go back to the command prompt, type “CD C:Test” (of course, again replacing “Test” with the name of the folder,) and then type “attrib filename -s -h”. You should now be able to find your file again!Method 2
This works both on Windows XP and Vista, not sure about other Win versions. What this will do is make selected folder invisble, not hidden. The folder will be only visible when you try to highlight it (see below). If you want to make sure that no one discovers it by chance then also move it to the corner of the screen.
Create a new folder.Rename: Highlight the folder and Click ‘F2' button. Hold the ‘Alt’ key and type in 0160 (you won’t see those 0160 numbers while typing them). Press Enter. Note, you have to use the numpad to enter these numbers.Change icon: Righ click the folder >> Properties >> Customize >> Change the icon >> Select the blank one >> Ok.
Method 3 (this is where it starts to get slightly more difficult)This method, unlike the previous one, hides an entire drive instead of individual files or folders:(Before you ever use the registry I HIGHLY RECOMMEND backing up your registry with a tool similar to Registry Tool or CCleaner. You may as well use a manual method similar to this.)1. Go to “Start,” “Run,” and type regedit.2. When the registry editor loads, navigate to: HKEY_LOCAL_MACHINESoftwareMicrosoftWindowsCurrentVersion
PoliciesExplorer3. Right click on “Explorer” and select “New” and “DWORD Value.”4. Name the value NoDrives and select “Decimal” as the base.5. In the value type the number that corresponds with the drive below:(E.g. If you would like to hide drive E, type 16. You may also hide multiple drives by adding the two numbers. E.g. If you would like to hide drives E and G, 16+64=80.)6. Now, after you restart your computer, you should not be able to see the drive.1. Create a folder in a drive for easy access, e.g. C:. (Name it something related to the Control Panel, e.g. Users.)2. Create a new file in Notepad and copy and paste the following into it:ren Users Users.{21EC2020-3AEA-1069-A2DD-08002B30309D}3. Replace “Users” with the name of the folder you created and save the file as loc.bat.(You should now be able to see your folder and the loc.bat file, with the loc.bat in the same directory as the folder Not in it.)4. Now, right-click and create another text file. Copy and Paste the following into it:ren Users.{21EC2020-3AEA-1069-A2DD-08002B30309D} Users
(Make sure to replace the word “Users” with the name of your folder.)6. Now you should see the loc.bat and the key.bat files in the same directory as the folder you created.7. Now, all you need to do is double-click on the loc.bat file and the folder should have an icon that looks like the control panel. If you click on the folder it should redirect you to the Control Panel and thus you have locked the folder.8. Of course, to unlock it, simply double-click on the key.bat file and the folder should turn back into the folder you first created.

Temporary Mail

| comments (1)

Ever wanted a quick, easily setup e-mail account when you suffer internet, when you register for services and still remaining your email account secure and avoid spamming from those sites? Then you are in need of a temporary or a disposable mail account.
There are two types of temporary mail accounts1.       Expires over time – you are given some time to use it and the inbox will be cleared after that time period.2.       Remains over time – all the mail to this accounts are remain irrespective of the time. ·         Use to log in to forums, decision groups, chat rooms and play around easily·         Some information on forums are hidden and only be seen to members. ·         Can be used as a secondary mail and even forward them to your mail. Well following listed are some of the first page hits I got from a simple Google search. There are thousands of free temporary mail providers on the internet. Just stick to a few so that you know how to get it done easily. These are the ones I use. All of them support reply, forward, and send message as the new mail account.You only need to enter the username and you will be taken to your mailbox. But use with caution. If anybody who know you email address can access to it. If you need a mail account not to be reset. This is a good choice.As the name implies it only available for 10 minutes. You can extend if you want. One advantage is that your are at the inbox of your gven a mail account as you enter the site. So no need to enter a user id.  Just copy it and you can use it.This can you used to forward mail from your new account to a account you specified for a given time period.

Create Stunning Presentations

Saturday, November 26, 2011 | comments

Would you like to do stunning presentation? Leave the old transition based Power Point presentations. It is time to switch to storytelling presentation. It is all about the new era of presentation. “Prezi” ,  a Flash based online Presenting / Story Telling application.

This is the coolest presentation tool I have ever used and yet it is free of charge too. Here is the official intro  on Prezi. It would not take more than 1 min to watch it but I will guarantee you that it will save more than thousands of your boring presentation seconds. Working with Prezi is easy just go to Prezi and create a account and start building prezi. Be sure to visit their showcase to see what are the potentials and some useful template you can use to your presentation.
 
Support : Sanjaya Einy | Blogger Tricks Templatee
Copyright © 2011. Tips and Tricks NET - All Rights Reserved
Template Created by Creating Website Published by Mas Template
Proudly powered by Premium Blogger Template